Eid Collective

  • DECORATIONS
    • Decor
    • Party & Tableware
  • DIY/CRAFTS
    • Crafts
    • DIY Decor
  • FOOD
    • Meals
    • Drinks
    • Desserts
  • GIFTS
    • Gift Wrap
    • Gift Ideas
  • FASHION
    • Adult Fashion
    • Kids Fashion
  • KIDS
  • SPIRITUAL
  • Shop

Eid Collective

  • DECORATIONS
    • Decor
    • Party & Tableware
  • DIY/CRAFTS
    • Crafts
    • DIY Decor
  • FOOD
    • Meals
    • Drinks
    • Desserts
  • GIFTS
    • Gift Wrap
    • Gift Ideas
  • FASHION
    • Adult Fashion
    • Kids Fashion
  • KIDS
  • SPIRITUAL
  • Shop
  • DECORATIONS
    • Decor
    • Party & Tableware
  • DIY/CRAFTS
    • Crafts
    • DIY Decor
  • FOOD
    • Meals
    • Drinks
    • Desserts
  • GIFTS
    • Gift Wrap
    • Gift Ideas
  • FASHION
    • Adult Fashion
    • Kids Fashion
  • KIDS
  • SPIRITUAL
  • Shop

Eid Collective

Eid Collective

  • DECORATIONS
    • Decor
    • Party & Tableware
  • DIY/CRAFTS
    • Crafts
    • DIY Decor
  • FOOD
    • Meals
    • Drinks
    • Desserts
  • GIFTS
    • Gift Wrap
    • Gift Ideas
  • FASHION
    • Adult Fashion
    • Kids Fashion
  • KIDS
  • SPIRITUAL
  • Shop
craft TAG
HomePosts Tagged "craft"

Tag: craft

gift box printable_article cover
CraftsDIY/CRAFTSGift WrapGIFTS
December 11, 2023BY eidadmin

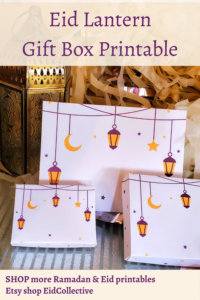
Eid Lantern Gift Box Printable

Make it a Ramadan ifar treat box, an Eid gift box, whatever you can think of!

Introducing our Eid lantern gift box printable! A fun little box that you can print at home. Surprise your guests at iftar with your favorite cookies. Wrap a nice piece of jewelry or place a gift card inside it. It’s so versatile and you can even get the kids involved with the assembling of the gift box.

Let’s explore the different sizes…and all you have to do to is change the printer sizes with this one printable. And if you’re looking for the perfect craft supply list, head over to our article now.

Sign up for our newsletter and get all the printables sent to you email every time.  And make sure to follow us on Instagram for more Ramadan & Eid inspiration.

Note: This post contains affiliate links. You can read our privacy policy.

Let’s see all the fun ways to use the printable!

Full Size

20210204_095621 (1)

For the normal, or large sized box, all you have to do is hit print. No customizing the size. Once it’s printed you’ll cut out along the solid lines. Then fold on the dotted lines. We recommend that you tape the inside of the box for maximum hold – but it isn’t necessary.

We love these sharp scissors to really get into the corners, and this paper cutter for clean straight-line cuts.

20210204_100805 (1)

Once the box is assembled, all you have to do is fill the box with a gift and write the recipients name on it!

Customize the Size

20210204_101808

If you’re looking to print different sizes, follow the guide below. You can really customize the sizes to whatever percentage you set the printer to. If you want to duplicate what we did with the large, medium and small boxes you’ll need to print to normal size, 70% and 50%. Have fun!

How to Make a Smaller Box:

  • Hit print
  • Go to ‘more settings’
  • Go to ‘scale’ – hit ‘custom’
  • Select the the size you’d like – we did 70% for the medium size and 50% for the small size
SHOP NOW

Showcase it! When you print up the Teacher gift tags for Eid lantern gift box printable, make sure to tag us in your photos. We look forward to seeing how you’ve displayed it!

And make sure to follow us on Instagram for more Ramadan & Eid inspiration.

Share This Article
Pinterest
Facebook
Twitter
LinkedIn
Read more
20220313_121538
DecorDECORATIONSDIY DecorDIY/CRAFTS
December 11, 2023BY eidadmin

Ramadan Cricut Blanket DIY

Decorate your couch this Ramadan with our Ramadan Cricut blanket

You’ve got to make this Ramadan Cricut blanket DIY. Because it’s fun and gives a little hint of Ramadan on your couches & chairs. Plus, you can snuggle up on these cool Ramadan nights. We love a good functional craft. And if you’re into Ramadan Cricut project & ideas, check out our Ramadan doormat DIY.

Plus, we’ve included the lantern png file below! Just image the other Ramadan & Eid project you can do on your Cricut or Silhouette. WATCH the how-to on our YouTube Channel!

Make sure to check out our other Cricut projects in our DIY tab,

Sign up for our newsletter and get all the DIYs sent to you email every time.  And make sure to follow us on Instagram for more Ramadan & Eid inspiration.

Note: This post contains affiliate links. You can read our privacy policy.

20220312_162243

Supplies

Products are linked, or visit our full Amazon Cricut supply list

  • Cricut Explorer or higher
  • Blanket – we got a fleece in dark grey
  • Heat transfer vinyl glitter (HTV) or regular
  • Strong grip mat
  • Scissors
  • Weeding tools
  • Iron or Cricut Heat Press
  • Heat pad or towel

How to make the Ramadan Cricut Blanket DIY

The first thing you need to do is open Cricut on your computer. Then download our lantern file, at the bottom of the article. Once you do, upload the png file to Cricut. We choose moderately complex. No background remover needed so just select apply & continue. Next select cut image and hit upload.

20220312_143939

Configure the Image

Once it’s uploaded, select the image and hit add to canvas. Now that you’ve got one lantern, you’re going to want to make it approximately 3 inches wide by 6 inches tall. Now duplicate that image five times, for a total of six lanterns.

For the advanced Cricuters out there, you could even place a box on top of the large part of the lantern and make a cut out there or add another color and layer the vinyl.

The lanterns will be printed on a strong grip mat, and we’re using glitter heat transfer vinyl (HTV) so we need to keep it within the roll we have, which means it can’t go over 12 inches wide, and 12 inches tall.

20220312_144545

Print

Time to send to the printer. Click ‘make it’ and make sure that all of your lanterns appear on your mat. If not, you’ll need to adjust their sizes ever so smaller for it to fit.

When you’re dealing with HTV you always want to hit the mirror button, so turn that on. Now because these lanterns aren’t words, they’ll cut the same regardless of mirroring, I still do it to get into the habit.

Before you print make sure your dial is on the correct setting! Switch your knob to custom, then select glitter iron-on. Glitter is a little thicker and we want a nice clean cut. Pressure setting, default. If you’re not doing glitter you can select the regular iron-on knob on your Cricut.

20220312_145651
20220312_150001

Grab your strong grip mat and cut the iron-on to the size you’ve made it. Glitter vinyl is so thick that typically a regular stick grip mat won’t hold your HTV well enough in place. If you’ve got an area where there are no lanterns, go ahead and trim that glitter out. No need to waste glitter HTV.

Make sure to place the HTV shiny side up! We did a total of 7 lanterns, because honestly, we messed up the first cut and we’ll explain how in the next step. But print as many as you want!

20220312_154943

Let the Cricut cut it our your lanterns. Never mind the change of mats in the photo, let us tell you what happened. We didn’t understand the depth of the cut on our lanterns. We did a first run but the lanterns weren’t completely cut out, like traditional vinyl, and so we kept going until we realized this.

HTV is vinyl & transfer tape in one. Which means it only needs to cut the vinyl but doesn’t need to cut the transfer tape on the mat side. That means your lanterns will look cut out on one side, but not on the other. This is what you want!

Check out the mat side of the HTV, not a cut to be seen. And that’s what you want with HTV.

Now it’s time to individually, with scissors, cut each lantern out. Be careful when doing it – you definitely don’t want to cut through a lantern! And don’t cut the lanterns out exactly, leave space all around the lantern so you can get a grip on the transfer tape and pull off after ironing them on.
20220312_155241

Lay down your heat pad or towel, doubled over, on your table. Place your blanket on top. Next, figure out spacing of the lanterns. We did 2 1/2 inches in between, but I would bump that up to 3 or 3 1/2 inches space. Heat the iron to 315 degrees while doing this.

20220312_161349

Before ironing on your first lantern, you’ll need to heat the area where your first lantern will go. Don’t skip this step, it’s important, and helps the vinyl create a smoother finish. Press down for around 7-10 seconds.

Once the blanket is warm, place your first lantern down and place the iron on it, with pressure, for 30 seconds at 315 degrees.

20220312_160114 (1)

Keep repeating with each lantern. Heat the blanket, then iron on the lantern. Once you’re done with the entire front part. Flip the blanket and iron every lantern once more for 30 seconds at 315 degrees with pressure.

20220312_161828

Flip the blanket over and start peeling the transfer tape off each lantern, and you’re all done!

Now display your Ramadan lantern Cricut DIY and marvel at your craftiness. This would make a fantastic homemade Ramadan or Eid gift too.

Supplies

Products are linked, or visit our full Amazon Cricut supply list

    • Cricut Explorer or higher
    • Blanket – we got a fleece in dark grey
    • Heat transfer vinyl glitter (HTV) or regular
    • Strong grip mat
    • Scissors
    • Weeding tools
    • Iron or Cricut Heat Press
    • Heat pad or towel

Instructions

WATCH the full tutorial for our YouTube channel!

  1. Open Cricut on your computer.
  2. Download our lantern file.
  3. Upload the png file to Cricut. We choose moderately complex. No background remover needed so just select apply & continue.
  4. Select cut image and hit upload.
  5. Once it’s uploaded, select the image and hit add to canvas.
  6. Make the lantern approximately 3 inches wide by 6 inches tall.
  7. Duplicate that image five times, for a total of six lanterns.
  8. For the advanced Cricuters out there, you could even place a box on top of the large part of the lantern and make a cut out there or add another color and layer the vinyl.
  9. The lanterns will be printed on a strong grip mat, and we’re using glitter heat transfer vinyl (HTV) so we need to keep it within the roll we have, which means it can’t go over 12 inches wide, and 12 inches tall.
  10. Send to the printer. Click ‘make it’ and make sure that all of your lanterns appear on your mat. If not, you’ll need to adjust their sizes every so smaller for it to fit.
  11. When you’re dealing with HTV you always want to hit the mirror button, so turn that on. Now because these lanterns aren’t words and they’ll cut the same, regardless of mirroring, I still do it to get into the habit.
  12. Before you print make sure your dial is on the correct setting! Switch your knob to custom, then select glitter iron-on. Glitter is a little thicker and we want a nice clean cut. Pressure setting, default. If you’re not doing glitter you can select the regular iron-on knob on your Cricut.
  13. Grab your strong grip mat and cut the iron-on to the size you’ve made it. Glitter vinyl is so thick that typically a regular stick grip mat won’t hold your HTV well enough in place. If you’ve got an area where there are no lanterns, go ahead and trim that glitter out.
  14. Place the HTV shiny side up! We printed a total of 7 lanterns, but six would look great.
  15. Let the Cricut cut it. Side note:  HTV is vinyl & transfer tape in one. Which means it only needs to cut the vinyl but doesn’t need to cut the transfer tape on the mat side. That means your lanterns will look cut out on one side, but not on the other. This is what you want!
  16. Cut each lantern out with your scissors. Be careful – don’t cut through a lantern! And don’t cut the lanterns out exactly, leave space all around the lantern so you can get a grip on the transfer tape and pull off.
  17. Lay down your heat pad or towel, doubled over, on your table. Place your blanket on top.
  18. Heat the iron to 315 degrees.
  19. Figure out the spacing of the lanterns. We did 2 1/2 inches in between, but I would bump that up to 3 or 3 1/2 inches space.
  20. Before ironing on your first lantern, you’ll need to heat the area where your first lantern will go. Don’t skip this step, it’s important for and helps the vinyl create a smoother finish. Press down for around 7-10 seconds.
  21. Once the blanket is warm, place your first lantern down and place the iron on it, which pressure, for 30 seconds at 315 degrees.
  22. Keep repeating with each lantern. Once you’re done with the entire front part. Flip the blanket and iron every lantern once more for 30 seconds at 315 degrees with pressure.
  23. Flip the blanket over and start peeling the transfer tape off each lantern
  24. All done!

Printables are intellectual property of Eid Collective. You may not use Eid Collective printables to sell items or alter them in any way. Please do not send or distribute printables to others, once you gain access to the printables, it is for you, and you alone to print and enjoy.

SHOP NOW

Showcase it! When you print up the Ramadan Cricut Blanket DIY, make sure to tag us in your photos. We look forward to seeing how you’ve displayed it!

And make sure to follow us on Instagram for more Ramadan & Eid inspiration and sign up for the newsletter for discounts and printable releases.

Share This Article
Pinterest
Facebook
Twitter
LinkedIn
Read more
  • Pinterest
  • Facebook
  • Instagram

Recent Posts

  • Where to Buy Ramadan & Eid Family and Kids Pajamas
  • 10 DIY Ramadan Home Decoration Ideas
  • 10 Fantastic Ramadan Baskets & Bags
  • Kid’s Ramadan Mini Masjid Ideas
  • 2024 Ramadan & Eid Calendar
Shop Printables
Categories
  • Crafts
  • Decor
  • DECORATIONS
  • Desserts
  • DIY Decor
  • DIY/CRAFTS
  • Drinks
  • Educational
  • FASHION
  • FOOD
  • General
  • Gift Wrap
  • GIFTS
  • KIDS
  • Kids Crafts
  • Meals
  • Party & Tableware
  • SPIRITUAL
  • Instagram
  • Facebook
  • Pinterest
  • YouTube

email: eidcollective@gmail.com

Privacy Policy

Contact

Press

Printable Library

Copyright © 2022 Lemani by WebGeniusLab. All Rights Reserved